Showing posts with label KID'S MEAL. Show all posts

January 3, 2016

#Easyrecipe - Baked Chicken Petit Cups

The holiday season was gone in a wink. Back to the routine life again. The season of the jingle bells, fancying around with the festive mood, the illuminated road sides all joined together to celebrate the end of a year and to welcome another new year. The last year went away to me in a fraction of moment. I have seen lots of ups and down this year and never wish to have this kind of year in my life again. But on the sweet note, last year blessed me my second princess who came to our life like a ray of hope. I must mention that I was able to overcome my pregnancy period fighting with all the odd situations because of the constant support and care of the elder princess and the man. I wish this year should bring us and everybody all the happiness and joy and prove a memorable one with all positive notes. 
                 As promised, I am here again with another #easyrecipe that can be done in all most no time. Very healthy and it is a kid's delight. Me and my daughter often enjoy it mostly when the man is on his office tours and we have to snuggle in a one pot meal.
Ingredients:
{Yields to 6 to 8 cups}
Minced Chicken 200grm
Grated carrot: 1 big
Blanched chopped Spinach - 1 cup (Water thoroughly squeezed)
Grated Cheese- 1 cup (more or less) {I used Amul}
Tomato - 1 small, sliced
Sweet Chili Sauce - 1 tspn
Italian seasoning - 1/2 tspn
Salt and pepper as per taste
Cornflour: 1 - 2 tspn (optional)
Method:
1. Take a muffin pan. Grease it oil.
2. Mix all the ingredients except the Cheese, Carrot and tomato.
3. If you feel the mixer is too soft then add cornflour (As per requirement).
4. Take a small portion of the mixture and put in the muffin cups. Press the mixture and give the impression of a cup.
5. Fill the other cavitities in the same way.
6. Now fille the cups with carrot and cheese and top it with a slice of tomato.
7. Bake at 200 degree C for 20 to 30 minutes.
8. Serve hot with some desired dip.
Note:
One can use other vegetables too for the mixture and for the filling.  


Wish you all a happy and Prosperous new year.


August 14, 2015

Mushroom Baby-corn Muffin

You must have read in my earlier post that preparing lunchbox for my 8 year old girl has become a nightmare for me. The reason, what ever or how much tasty dishes I share in her lunch box it will be surely coming back home only half eaten. I started spending sleepless nights - 6 hrs +2 hours stay away from home with such a little food consumption, must be badly affecting the lil one's health. So  in the evenings I started making myself occupied by giving trials with different snack idea. If the lil one approves then 'BINGO'.. Next day that will go in her tiffin box. The other day I made these little savoury muffins that did tickle my princess's taste bud and to my surprise the next day I found her tiffin box empty. Not only she but her friends loved it so much and now I have to send few extra so that my princess and her friends can have a snack party everyday. So here is recipe of Mushroom Baby-corn Muffin:
Ingredients
{Yeilds - 3-4 muffin (medium size)}
Egg - 2
Flour - 1 tbspn
Mushroom & Baby Corn - 1/2 cup chopped
Onion- 1/2 of one small chopped
Cream Cheese - 1 tbspn (Optional - See Notes)
Pizza Cheese - 1 tbspn (See Notes)
Nutmeg powder- a pinch (See Notes)
Tobasco/ Chili Sauce - 3 to 4 drops or as per taste.
Salt, Sugar & Black Pepper Powder - As per taste
Butter - 1 tspn
Method
1. Whisk two eggs and flour, add a pinch of salt and keep aside.
2. Heat a pan . Add butter, let it melt down then add garlic. Saute for a minute.
3. Add chopped onion. Fry them for a couple of minutes.
4. Add the Mushroom and Baby corn. Fry for 2 minutes more. 
5. Add salt, pepper, sugar and cream cheese.
6. Cook then in a low flame until the cream cheese gets melted and well mixed.
7. Sprinkle the nutmeg powder, mix well.
8. Cool the mixture for a while then add it with the egg mixture. Add the Pizza cheese and Tobasco/ chili sauce too.
9. Now take 3- 4 muffin cups. Pour the mixture evenly in each cup.
10. Bake for 15 to 20 minutes at 180 degree C.
11. Serve warm with some dips/ sauce.
Notes:
1. One can mix other vegetables too.
2.  One can add chicken/ bacon or sausages to make it more tasty.
3. To make Nutmeg Powder just take the nutmeg and grate it in a fine grater.
4. I had Britannia Cream cheese at home so used it here. But if it one doesn't have any just increase the cheese portion.
5. Instead of Pizza cheese,  Amul cheese cube can also be used.

December 20, 2010

Raspberry Quell

Now before taking a big break from the blogging world I would like to share at least few of my favourite recipes which I enjoyed and loved to share with you all too. I don't have much time to spend a lot of time here. But I will try to post few of my favourite recipes and crafts which I enjoyed with my family. Today I am going to share this sweet after which is one of my daughter's favourites.

Ingredients:-
1. Raspberry- 2cups
2. Sugar- As needed
3. Yoghurt-1Table spoon
4. Whipped Cream for topping(optional)


Method:-
Mix all the ingredients except the cream and put in the mixer. Blend it until smooth. Put in the freezer for couple of hours. Then again put in the mixer to crush the ice. Serve it with whipped cream topping.

Note:
You can also serve it as a drink by adding little bit of cold water and a couple of spoons of yoghurt more.
Raspberry Icecream is also another very good option for a healthy dessert. Visit my Strawberry Icecream recipe. You can make it the same way as I made the Strawberry Icecream.


Sending this to Indrani of Recipe Junction 's Summer Fruit event:


August 26, 2010

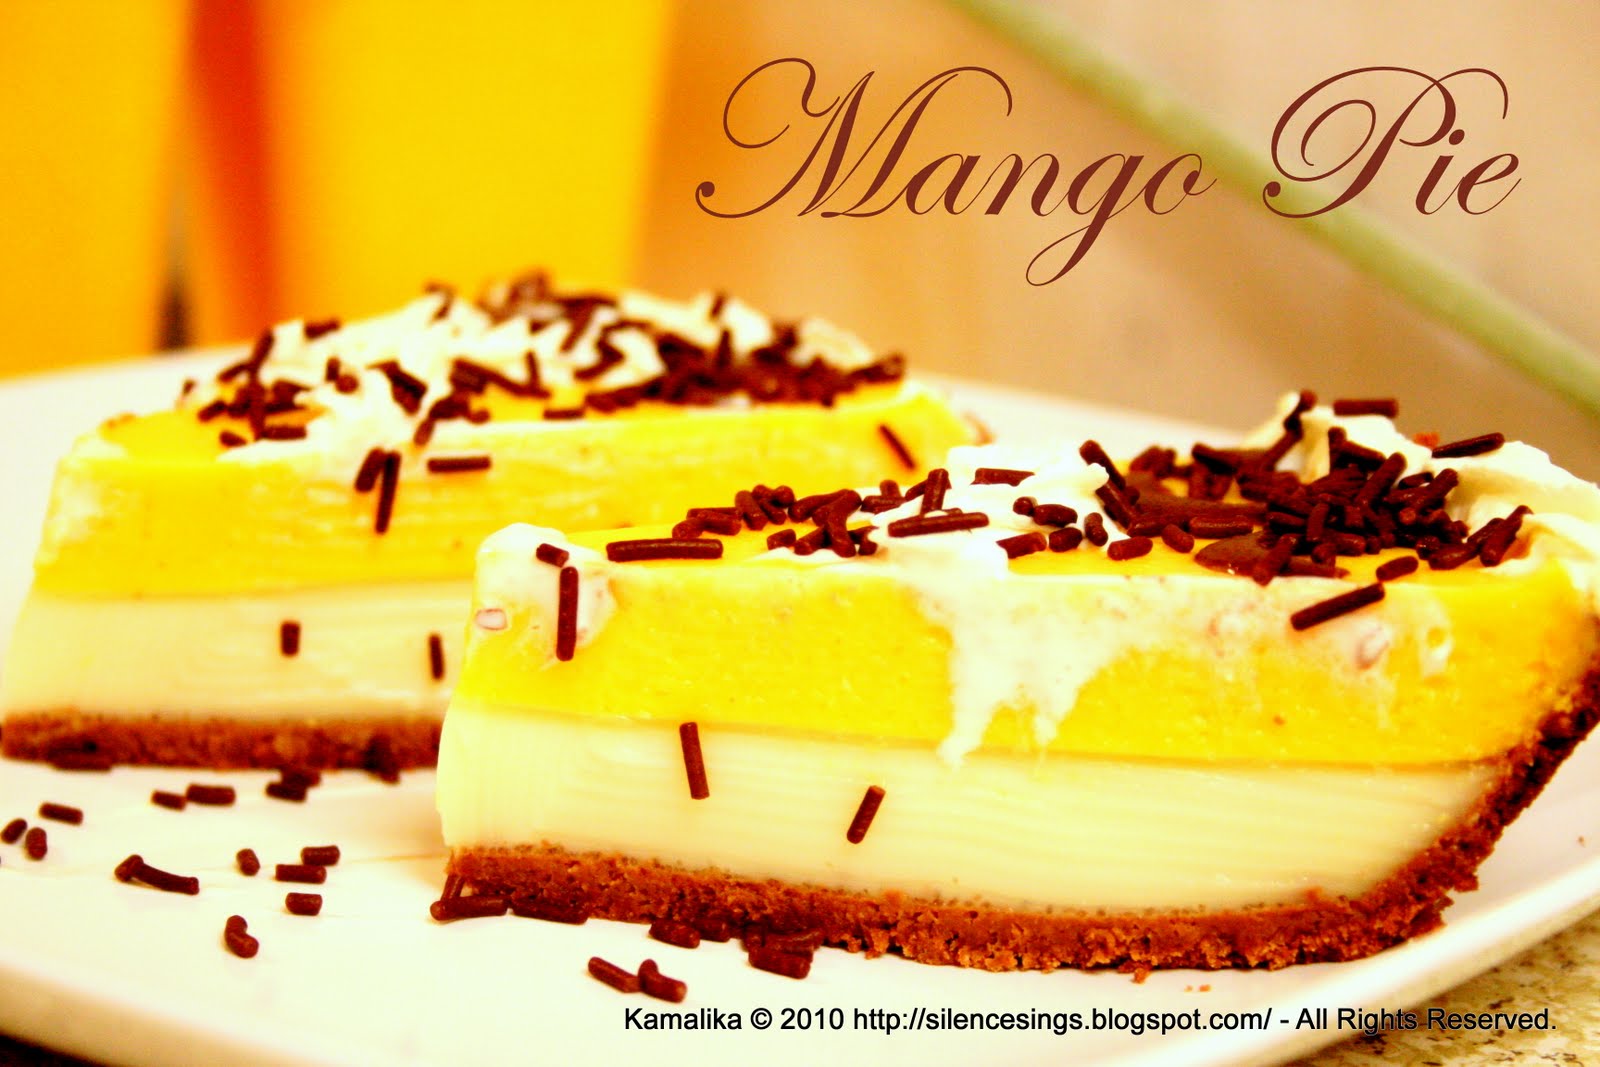
Mango Pie


The dulcifying savour still smacks my lips. I tasted this dish in one of my husband’s colleagues’ party almost 4 years back. This was served as the dessert and everyone englutted it in no time. Being a newlywed bride my prime attention was then to feed my husband with new kind of viands. Cooking then became a passion for me and a ritual to ask for each and every recipe served in each party. And all the hosts got to get ready with their recipes handy before my arrival.


Mango Pie is one of the most challenging recipes till date for me which I failed to make two times and then quit 4 years back. I noted down the recipe properly but never understood the trick of wielding the Gelatin then. Both the times the pie was failed to jell. I dared to ask the recipe again as this was prepared by the colleague himself and all my research on setting a pie from the net didn’t work at all. So the best option I chose to relinquish. Now almost 4 years are passed and I have become the queen of the kitchen in moderate sense. In this long run, I crafted my hands in Jell-O making quite often. And two of my greatest achievements, the Layered Jell-O and the Broken Glass Jell-O gave me the confidence to try the failed recipe once again. No need to say this time when I defied the dish, it’s a grand success. You all should see the winning pacification on my face when I saw the pie congealed. This time I made a little bit of change by the addition of a layer of jelled condense milk, as I have to use the condense milk any way. With the addition of the layer the pie looked more colourful and tasty too.  The base of chocolate pie crust and two layers of a gelatinous condensed milk and the piquant mango pulp conflated with cream cheese, made a luscious twinge of delicacy. Both the kids and the adult would enjoy the dish till the last bite.

  Shuffling some information on Gelatin last night, I encountered with this fact, from which I was totally ignorant-
“Gelatin is a protein substance derived from collagen, a natural protein present in the tendons, ligaments, and tissues of mammals. It is produced by boiling the connective tissues, bones and skins of animals, usually cows and pigs. Gelatin's ability to form strong, transparent gels and flexible films that are easily digested, soluble in hot water, and capable of forming a positive binding action have made it a valuable commodity in food processing, pharmaceuticals, photography, and paper production.” 
 

Did you know that!!!!! If you want to read more about Gelatin go Here.


 Now come to the recipe:-

Ingredients:-
Instant Chocolate pie crust base- 1
The first layer of Condense Milk:-
Condensed Milk- ½ cup
Knox Gelatin- 1 envelops
Water-1 cup
Second Layer of Mango Pulp:-
Mango pulp- 1 cup
Cream Cheese- 2 table spoon (soften in room temperature)
Water- 2 cups
Knox Gelatin- 2 envelops


Method:-

The first layer of Condense Milk:-

1. Boil ¾ cup water.

2. Pour the condense milk in a bowl and add ½ cup boiling water. Fold nicely.

3. Pour 1 envelop of gelatine in ¼ cup of cold water, stir gently and leave for 2mnts to set. Add the remaining hot water. Mix well.

4. Add the gelatine to the milk mixture. Sir well.

5. Pour it on the pie crust base and refrigerate for 3-4 hours to set.

Second Layer of Mango Pulp:-

1. Boil 1 ½ cups.

2. Blend the Cream Cheese and the Mango pulp nicely. Add 1 cup boiling water.

3. Pour 2 envelops of gelatine in ½ cup of cold water, stir gently and leave for 2mnts to set. Add the remaining hot water. Mix well.
4. Add the gelatine to the mango pulp mixture. Sir well.
5. Pour it on the empty space of pie crust base and refrigerate for 3-4 hours to set. Best is to keep overnight to get the thick consistency. Enjoy....


Sending this to Indrani of Recipe Junction 's Summer Fruit event:

August 22, 2010

Broken Glass Jello- A sweet treat


Celebrating the 50th post of my blog with a sweet treat. On the auspicious day of my husband’s birthday my blog posts are glad to reach the half century. It’s a long run for me. But still I am happy to reach a cusp. The recipe, Broken Glass Jello, I have borrowed from The Food Librarian whose blog is full of magnificent recipes and I am literarily in love with her photography. When I first saw the recipe I was instantly moved by the colourful texture of the dish. And when I prepared it at home the dish didn’t take any time to vanish. Too easy to make and a toothsome bite both for the kids and the adults. My daughter got attracted with the colours and enjoyed it till the last bite. So without wasting any time let me share the recipe with you.


Ingredients:-
(serves 8,5oz cups)
2 package of Coloured Jell-o – 3oz each
Condensed Milk -1/2 cup
Knox Gelatine- 1 envelops
Water- 1 cup


Method:-
1. Prepare the coloured jell-o separately following the instructions given in the package. Refrigerate.
2. Cut them in to small cubes when they are fully set.
3. Boil ¾ cup of water. Add ½ cup boiling water with the condense milk. Blend nicely.
4. Pour the gelatine in ¼ cup of cold water, stir gently and leave for 2mnts to set. Add the remaining hot water. Mix well.
5. Add the gelatine to the milk mixture. Sir well.
6. Put the Jell-o cubes in the cups in equal measurements. The pour the milk mixture to each glass equally. Keep for at least 4-5 hours in the refrigerator to set. Enjoy them when they are fully set.

I would not be able to achieve this milestone if you, my fellow blogger friends, would not motivate and inspire me with your encouraging feedbacks on my each and every post. I wish and hope that you all will help me and will be by my side always to make this journey successful till end. Above all I would like thank my husband too, to inspire me a lot to continue this blog. This 50th post is a gift and tribute from me to my husband on his birthday- A small relic of love and respect.
I made some Layerd Jello too. Please find out the recipe Here.

This recipe is off to Pari's Only Kid's Delight Event. I am also sending the Chocolate Marshmallow Slices to this event.

August 16, 2010

Chocolate Marshmallow Slices


I bought a package of marshmallow since a long time. Though it’s not so long, I felt it had been a decade, as I almost forgot about the existence of the packet. Thanks to god that while cleaning my cupboard in the recent weeks, I found the untouched package and noticed the date about to expire. I bought it in thought of making homemade fondant roll. But somehow it didn’t turn out. This weekend I spent almost an hour in search of some nice recipes on marshmallow after my mind to save it from trashing off. I didn’t have the plan or energy to make fondant roll anymore, so I wanted some different and easy recipe to devour it. And then I found this Site and the recipe of Chocolate Marshmallow Slices. It is too easy to make and just tastes heaven. Each bite will give you a soft gooey chocolaty crunchy taste. The amalgamated combination of the chocolate, marshmallow and the nuts incorporated in a savoury sweet treat. Both my husband and my daughter (and me too) gobbled up it like crazy little children, same as our daughter. THis recipe is borrowed from Sheknows' Food & Recipes. Following is the recipe.

Chocolate Marshmallow Slices

Ingredients:
1/2 cup butter or margarine
1 package (12 ounces) semisweet chocolate chips (2 cups)
1 package miniature marshmallows (10&1/2 ounces)
1 cup finely chopped nuts

Method:

1. Melt butter and chocolate chips in a medium saucepan over low heat.

2. Stir constantly until both are well mixed.

3. Remove from heat; cool for five minutes. Stir in marshmallows and nuts. Do not allow marshmallows to melt.

4. Take a tray and spread a wax paper. On wax paper, pour the mixture and flatten. Gently roll the mixture using the wax paper but be careful not to roll the wax paper along with the mixture. Every time you roll take out the wax paper.

5. Refrigerate overnight. Cut the roll into slices. Though it is told to store in airtight container in cool, dry place, I reserved it in the refrigerator only.

Updating the post and sending it to the ongoing event of Kolkata Food Bloggers...

March 20, 2010

Apple Chicken with Green Beans

My daughter is very choosy about foods. Outside foods are the tastiest food to her. Everyday her appetite demands for new kind of foods. My each morning starts with a frown and a tensed face what new meal, am going to cook after her taste. She doesn’t like vegetables or fruits except green beans, spinach and banana. So every time I have to cook a healthy food which can supply nutrition to her body, in such a way, that she should not see what the ingredients are added to the dish. Chicken is one of her favourites. So last night I cooked chicken with apple and green beans. I served this to her with plain noodles, which she liked very much. The dish turned out very tasty and as well as healthy too. The dish doesn’t take much time to cook. This is a very healthy dish for the kids as well as for the adults too. The recipe is as follows-
Ingredients:-

Chicken- 6-8 pieces (Medium, with bone)
Chopped garlic- 1 table spoon full
Garlic paste- 1 tea spoon
Onion – 1 medium (sliced)
Green Beans- a handful
Yoghurt- 2 tea spoon
Apple- 1 medium (I used green apple)
Oil- 2 table spoons
Salt, sugar and pepper- according to taste


Method-
1. Marinate the chicken with the yoghurt and little bit of salt for 10 mnts.

2. Heat 2 table spoons of oil in a pan, add the chopped garlic. When it will turn brown put the onion. Fry them till the onion turns golden.

3. Add the ginger and the chicken. Sauté for few mnts. Put a lid on. Keep on stirring in low heat in intervals.

4. Grind the skinned apple in to a paste. When the chicken seems semi cooked add the apple. Add salt, sugar and pepper according to taste. Stir nicely. Keep on cooking with the lid on. After 5mnts add the whole green beans.

5. When the chicken is fully cooked and the juice is dried up, serve it with bread/roti/rice/noodles whatever you and your baby likes.

March 3, 2010

Baked Spinach Chicken with Baked Potato

Ingredients:-
Note:
I awalys keep on experimenting with the various kinds of sauces. It is not mandatory to use these sauces only. You can use whatever sauces you want to use for the marination.

Spinach- 1 bunch
Chicken Breast- 4 Fillets
Honey Mustard sauce- 1 tea spoon
Soy Sauce- 1 table spoon
Pasta sauce-2 table spoon
Peanut butter- 1table spoon
Salt- to taste
Sugar- 1 tea spoon


Method:-

Pre heat the oven to 350 F.


Wash the Spinach thoroughly. Chop roughly into small pieces. Cook in the Microwave for 10 mnts adding a pinch of salt. Drain the excess water and reserve the blanched spinach.
Note:-
Before baking any spinach dish always blanch it. The Spinach leaves lots of water during cooking. Therefore if the extra water is not drained ,that may differ the taste of a dish.


Take all the sauces, salt and sugar in a bowl. Mix gently.


Take an oven proof deep dense greased tray. Place the chicken breasts. Add the sauce and spinach. Fold all well. Then place the breast side by side. Bake for 35 to 40 mnts. In between turn the breasts to the opposite side. Serve hot with baked potato and salad.


This is a very full and healthy dish
 for the adults and a very healthy and tasty dish for the kids too.


Baked Potato:-


Ingredients:-

Potato- 4 medium size
Salt-to taste
Italian Seasoning-1/4 tea spoon
Oil- Few drops


Method:-
Pre heat the oven to 400F.

Wash and then wipe dry the skinned Potatoes. Cut the Potatoes in desired shapes but be carefully the pieces should not be too thin or too thick.
Grease an oven proof tray. Put the potato slices on the tray add all other ingredients along with the oil and mix well. Bake for 10-15 mnts. Turn the slices then again bake for another 10-15mnts more. Keep on checking so that the potatoes should not turn too brown. Serve hot.

This recipe is off to 'Healing Foods Event-Spinach' , hosting by Divya and started by Siri.

February 24, 2010

Stuffed Mini Boule


Stuffed Mini Boule or in simple terms Stuffed Bread is one of the hot pot items in my Food Menu. Just a couple of days back I prepared the dish after a long gap. My husband relishes and enjoys the dish to its full pit always. This is the first time, I served it to my daughter and to my wonder she finishes her plate just in no time. Now a day I mainly cook the dishes placing myself to my daughter’s place, what she will like and what will be healthy for her and of course it should take the shortest time to prepare.This dish takes very little time to prepare. The time what it takes is the baking time. It is a very full meal which can be served as a breakfast, a lunch or as a dinner too. The crispy and crunchy taste of the bread blend marvellously with the soft and spongy bite of the stuffing. I usually prepare the dish with French bread. But this time I got the Mini Boule instead. The French word boule means ball or round, so “boule” may be used to describe a variety of breads that all have the boule shape in common. A typical French boule is a hearty, country bread with a chewy crust, an open crumb, and a moderately soft interior and is baked in many different sizes. It is most often prepared with white bread flour made into a similar type of dough used for a French Baguette (narrow French stick loaf); however a variety of flours and other ingredients can be used.


Ingredients:

Pls note: All ingredients used are according to my own taste change the measure as per your taste.

• Whole Bread- 1 (not the slice one. Pls get the bread which looks dense in width.)
• Egg- 2
• Boiled potato- 1 medium size
• Boiled carrot- 1 small or ½ of the medium size
• Chopped colour bell pepper- ½ Cup
• Chopped tomato- ½ cup
• Grated Ginger- 1 tea spoon
• Grated cheese- ½ cup
• Melted butter- ¼ cup
• Italian seasoning- according to taste (Tip: I usually store the seasoning mixes delivered from the Pizza hubs. In need they help to season my preparation perfectly)
• Salt, Sugar, Black pepper- As per taste

Method:-

• First slice the head of the bread in round shape. Scoop out the bread from inside, so that should look like a bowl. Keep the extra bread in a separate container.
• Preheat your oven to 375 F.
• Now take the extra scooped bread. Crumble the bread with your hand. The feel of the texture will be like bread crumbs. Mix all the other ingredients gently except the cheese and eggs.
• Beat the eggs and fold it to the mixture. Pour the whole ingredient into the Bread bowl and cover the lid with the head of the bread slice.
• Grease the whole bread with butter.
• Grease a baking tray, place the bread and set it for baking for 40-45mnts.
• After 10mnts open the oven, remove the top of the bread and bake both separately just placing the bread slice side of the bread bowl. After 15mnts turn the bread slice to the other side.
• When the time is up check the bread stuff with a toothpick or a knife pricked in the centre comes out clean. If it’s done switch off the oven, bring out the tray and sprinkle the cheese on the top of the bread bowl and close the top once again with the bread lid. Put again to the oven and keep inside till the cheese melts down.
• Bring it out of the oven. Cut into thick chunks and serve with salad, boiled vegetables.

Note:

• The baking time I have given is as per my estimate. Your time may take more or less. Just keep on checking the colour of the bread and the Stuffing. If you see that the bread is getting over toasted then just decrease the temperature of the oven and bake it till the stuffing is done.
• The stuffing will flap up a little. Therefore don’t worry.


Variations:-

• You can add boiled chicken in the stuffing.
• Other breads are always welcome. Only they should be not sliced and thin.
• If you want to make it a vegetarian dish. Use corn flour instead of Egg. But be careful about the amount of the corn flour. Use only as much needed for a binding.


Culinary is just an Art of creation. Many a time, we just get a hunch of a recipe and make it in our own kitchen in our own way and as per our taste. But most of the time we create rather than recreate something.

I am sending this recipe to the Events -Sunday Snacks:Healthy Snacks .


MyFreeCopyright.com Registered & Protected