July 30, 2010

How to get rid of a Burning Yellow Stain from your Microwave


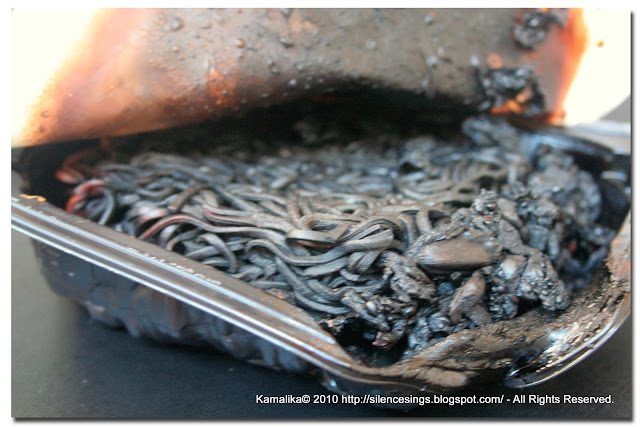
Last Sunday when my day started in exultation, it gleamed off to a galling fortuity. That Sunday morning was too lustrous for me as I resumed my blog again. My Husband was occupied in his prolonged last hours nap. My daughter woke up early, had her breakfast and we both were about to start our dance practice. Before that, to come down my hungry appetite I put the Ready-to-eat Chow-Mein to the microwave and joined my daughter to tap the floor. The music was on, my heart was floating in a kind of glee and my daughter was as usual in her gaiety mood. Suddenly my great redolent power froze me and the fume from the microwave made me stuck dumb for few seconds. I gathered all my intelligence and in a quick jump turn off the microwave. A burning smell almost clogged my breath. I locked my daughter in the bedroom with my husband. Opened all the possible way outs to get rid of the reek and to avoid the smoke alarm on. Covered my face with a towel and with a pounding heart opened the door of the microwave and found the charred plastic container. It didn’t take a second more to reveal what bungled mistake I had done. I had forgotten to add water to the Chow-Mein. Hapless I was just got the final shock when I stared into the Microwave. Somebody had just changed the white body into a yellow tarnish. We live in a rented house along with a furnished kitchen and the rental clauses say to leave the house before departure just as same we found while entering. The first dismaying thought crashed my mind with an outlay of around $300-400. The second thought came of getting a berating about my carelessness form my husband. Just on the verge of a sinking soul and ready to flow tears I started to scrub the yellow stain. All my efforts just went in vein when the firm stain didn’t lighten up a little. Without wasting more time and effort I sat down with my Laptop and started searching for the solution in the net. I felt relaxed that I was not the only execrable lady to bawl out. I found almost a handful of posting about burning plastic in the microwave and there were a handful of angels too who gave different solutions to get rid of the burning yellow stain from the microwave. So I started experimenting the solutions one by one.


Solution No 1:-

Scrub the stain with vinegar and water.

Result:-
Didn’t work.


Solution No 2:-

Scrub the stain with vinegar and baking soda.

Result:-

Didn’t work.


Solution No 3:-

Clean the stain with 100% bleach.

Result:-

I didn’t have Bleach at home. So not sure about the fact. But majority voted for the best result.


Solution No 4:-

Use Nail polish remover to scrub the stain. Always use white napkin each time you scrub.

Result:-
It did work. The stain just got vanished like a magic.


There were many more but I stopped my search here.


I am not so much fond of cosmetics. I hardly apply nail polishes and use removers. I bought one nail polish remover a year back in India and it did travel with me in this far away land, kept itself settled in a corner of a shelf without any notice all these months. But now it came like a saviour and emptied itself to save my poor soul from the dismay. Forgot to mention, while I was busy in staining off the parchedness, I felt a pat in my back and found my husband with an impish smile and a question mark in his face. I explained what happened in tears and to my surprise he just smiled and told me not to take too much tension, we would find out some solution. At that moment I just thought that I got the best husband of the world. Any way the little bottle of my nail polish remover saved me and showed me the path of the solution. It would be a great mistake if I would not praise my daughter. During this skirmish she didn’t disturb me for a second. She obeyed my each and every single word to my surprise.

5 days passed but still I can nose the burning smell. I got a solution to obviate the burning smell from the microwave. Put some Orange skin in water and microwave it for 5-6 minutes. It really worked well.
 

My husband arranged that day a delectable lunch in one of my favourite restaurants to celebrate my win over the tarnish. Whatever happened in between, the day started good and ended good. Truly said - All is well that ends well.


July 29, 2010

Checkerboard Cake

In my last post before I “Vanished”, I stated of sharing the Checkerboard Cake recipe. Now after almost three months I was able to share it with you all. Truly good that I kept a nexus to intertwine this big gap. Checkerboard Cake is very easy to make, only the trick is, you have to have the checkerboard cake baking set. I bought the set from Joann Store in a sell price of $7.00.The original price of it varies from $12-$16. I blindly followed the instructions as well as the recipe just given in the back of the package. The checkers of my cake didn’t come out that neat as in the picture it’s shown. I consider it OK for a first time experimenter.

Here is the instruction and recipe on the back of the package:

A piece of the Cake:-
The whole Cake:-

I decorated my Checkerboard cake with the Fondant roll. Here I am giving few designing tips about how to make Leaf, big and mini Rose flower.Only few things you have to keep in mind:

1. Always keep butter or shortening handy while decorating your cake with Fondant roll.

2. Keep the surface platform on which you will be working greased with butter or shortening for easy handling Fondant roll.

3. Always work with the approx amount of fondant what you exactly need. Fondant gets hard very soon. Therefore always keep the extra roll in an air tight container or a zip lock.

4. If you feel your Fondant has become hard, put it in to Kitchen Towel tissue and microwave it for 5-6 seconds. It you want more softness then heat it for a minute or so. Don’t over heat and be careful of burning your hands as fondant gets too hot if you over heat it.

5. To Colour your Fondant, always use toothpicks and add colour starting with a tip ting each at a time till you get the colour after your mind. In every colour addition make sure that you have mixed the colour well in the fondant. Use individual tooth pick for each colour.

How to make a leaf:-

Step 1:-
Make a ball.
Step 2:-
Flat it in a shape of a leaf.
Step 3 & 4:-
Take a tooth pick and give the impression of the veins.
Step 5:-
With a swift hand give the leaf a twist to look more lively.


 How to make a big Rose:-


Step 1:-
Make a ball.
Step 2:-
Flat it in a round shape .
Step 3:-
Fold it in half very softly, don't press it.
Step 4:-
Then from one side start roll it towards the other end. Do it very softly with out any press.
Step 5:-
Your Rose is ready.


How to make a mini Rose:-


Step 1:-
Make a small ball.
Step 2:-
Flat it in a round shape .
Step 3:-
Fold it in half very softly, don't press it.
Step 4:-
Then from one side start roll it towards the other end. Do it very softly with out any press.
Step 5:-
Your mini Rose is ready.

Once you start to play with the fondant you will feel that your creativity and different designing ideas are driving you crazy to give them a form. You can make different shapes of flowers, leaves, different shapes etc just using intelligence and the mere equipments. The cookie cutters work very well. You can also get lots of Fondant designing tools in the stores. You will also get a handful of designing tips on the net too.


Check out my other Fondant Cake HERE.


July 14, 2010

Back Again

Ah, a long gap......Last three months almost without any post is really a great gap. This is how time flies. You never know how time swings so fast and you keep on grudging that time is not moving. Every day before I retired to bed I used to visit my blog and my other fellow bloggers but I didn’t have enough time to leave a comment on each and everybody’s new post. Sometimes I like to enjoy this kind of hibernating state. Though I know there are hardly a few people who will look for me or think of me. But still this gives my heart a kind of peace to become inactive for a long time from the world which I cherish so much. On the other hand when you get a disruption it’s very difficult to set your mind to resume it again. That’s what happened to me. The first month I was really too busy to blog. The following next month I enjoyed my dormant state and this last month went by boosting myself to blog again. Today in this Sunday morning, when the regular weekend wakeup times are usually late, my sleep left me at 5.30am in the morning and made me too irritated to lay down with the opened eyes. It was too early to go for a walk, so I took my second love on my lap (my laptop), a frozen yoghurt and my mind automatically switched to engender my blog alive again. So friends, here I am once again. May be my comments missed your posts but I didn’t missed your posts. So please help me again with all your inspirational and encouraging feedbacks to walk with you all and your talents with my small world.

Happy Blogging!!!!


-->
MyFreeCopyright.com Registered & Protected